Skip to content
Home
Metabacklinks
  • Home
  • Services

    Self-managed website

    A premium website that updates itself.

    E-commerce website

    Sell online, without giving it a thought.

    Lead acquisition

    Your visitors become contacts.

    SEO / GEO referencing

    Get found on Google and in AI.

    Advertising campaigns

    Advertising that pays off, managed for you.

    Second opinion

    We check other people’s work.

    Redesign & maintenance

    We rebuild your website, then we look after it.

    Advice and training

    We train you in web and AI.

  • Expertise

    Artificial intelligence

    Understand AI, learn how to use it and automate your everyday tasks.

    Web & digital

    Your online presence designed end to end, from the first screen of your website to the sale.

    Business software

    CRM and ERP connected to your business, to manage your clients and processes in one place.

    Our CRM

    Our CRM

    Centralize your leads and clients, connected to your website and your agents.

  • AI agents

    Supervisor Agent

    A true conductor. Leads the team and keeps you informed of work in progress.

    Webmaster Agent

    Maintenance and backups. Optimized code for fast websites that stay online.

    SEO / GEO Agent

    Audits, indexing and performance. Your visibility on Google and in AI.

    Copywriting Agent

    Optimized content and editorial strategy.

    Web Marketing & Leads Agent

    Landing pages, conversion funnels and client lead generation.

    Community Manager Agent

    Social media, e-reputation and Google reviews.

    Conversational Agent

    Welcome, qualification and appointment booking. Also handles reminders.

    Cybersecurity & Compliance Agent

    Security, monitoring and GDPR compliance. Applies patches and reduces risks.

    SEA Specialist Agent

    Google Ads, Meta Ads and LinkedIn Ads. Costs tailored to your budget.

    Translator Agent

    A true linguist. Translation and adaptation into several languages.

    Growth Hacking Agent

    Experiments and growth levers. Capture your future leads.

    Tech Watch Agent

    Watching web, AI and trend developments. An investigative journalist.

  • Sectors

    Real Estate & Construction

    Agencies, developers, architects and construction.

    Health & Medical

    Practices, clinics, therapists and independent healthcare professionals.

    Tourism and Gastronomy

    Hotels, guesthouses, restaurateurs, caterers and estates.

    Education & Training

    Private schools and training centers.

    Public & Institutional Sector

    Town halls, local authorities, associations and federations.

    Founders & Inventors

    Launch your business, your network or your professional tool.

    Industry & Large Accounts

    Large companies, pharma, portals and extranets.

    Local Businesses & Professionals

    Garages, hairdressers, lawyers, notaries and artisans.

  • News & Guides

    All articles

    The whole blog, every section.

    News & analysis

    What is moving, and what it changes.

    Tutorials

    Step-by-step procedures.

frFrançais
Contact us
Home
Metabacklinks

Menu

  • Home
    • All services
    • Self-managed website
    • E-commerce website
    • Lead acquisition
    • SEO / GEO referencing
    • Advertising campaigns
    • Second opinion
    • Redesign & maintenance
    • Advice and training
    • All our expertise
    • Artificial intelligence
    • Web & digital
    • Business software
    • The whole team
    • Supervisor Agent
    • Webmaster Agent
    • SEO / GEO Agent
    • Copywriting Agent
    • Web Marketing & Leads Agent
    • Community Manager Agent
    • Conversational Agent
    • Cybersecurity & Compliance Agent
    • SEA Specialist Agent
    • Translator Agent
    • Growth Hacking Agent
    • Tech Watch Agent
    • All sectors
    • Real Estate & Construction
    • Health & Medical
    • Tourism and Gastronomy
    • Education & Training
    • Public & Institutional Sector
    • Founders & Inventors
    • Industry & Large Accounts
    • Local Businesses & Professionals
    • All articles
    • News & analysis
    • Tutorials

Create a Meta ad account

David TouzetDavid Touzet·Updated on 11 August 2026·6 min read
  1. Metabacklinks
  2. ›
  3. Articles
  4. ›
  5. Account access

This account is used by your Paid Search Agent, your Web Marketing and Leads Agent and your Growth Hacking Agent. It is the engine behind your Facebook and Instagram ads. The account stays yours, the payment card stays yours, and you see every penny spent. We become neither owner nor payer, we receive partner access that you cut off in 1 click. Allow 20 minutes, with your card to hand.

  • Step 1 · Open your Meta business portfolio
  • Step 2 · Complete your business information
  • Step 3 · Create the ad account
  • Step 4 · Add your payment method
  • Step 5 · Attach your Page and your Instagram account
  • Step 6 · Grant partner access to your agency
  • Step 7 · When it is the agency that invites you
  • Step 8 · The 3 settings that get your ads live first time
  • Step 9 · Changing Page or account without losing everything
  • Step 10 · The 3 security steps to take from the start
Step 1

Open your Meta business portfolio

Go to business.facebook.com and log in with the Facebook account that administers your Page.

Meta keeps your business assets in a business portfolio. That is the new name for Business Manager, Meta has renamed it and you will still come across both names depending on the screen. It is the same space. It holds your Page, your Instagram account and soon your ad account.

  • If you have already linked Instagram to your Facebook Page, this portfolio already exists, Meta created it along the way.
  • If not, click Create account and enter your company name, your name and your work email. A confirmation message goes to that address, so confirm it.

This step is done on a computer. The portfolio settings are far more complete in a browser, and some screens exist only there. If you only have a phone, open business.facebook.com in your mobile browser and request the desktop version of the site, it works fine.

Open Meta Business Suite ↗
Step 2

Complete your business information

The direct shortcut is business.facebook.com/settings/info. Through the menus it is Settings, then Business info.

Fill in the exact registered company name, the postal address and the website. These fields look secondary. They are not. They are what Meta relies on the day it asks you to verify your business.

Use the registered company name exactly as it appears on your official company record, letter for letter. A single spelling difference is enough to drag a verification out over several days.

While you are there, note the portfolio ID, that long string of digits shown at the top of the screen. You will be asked for it every time you contact Meta support, and to open partner access. Copy it into a notebook or a note on your phone right now.

Step 3

Create the ad account

The direct shortcut is business.facebook.com/latest/settings/ad_accounts. Through the menus it is Settings, then Accounts, then Ad accounts. Then click Add and choose Create a new ad account.

3 pieces of information are asked for.

  • The account name, your company name is enough.
  • The time zone, the one where you trade, London for a business in the UK.
  • The currency, the one you invoice in, pound sterling for a business in the UK.

Take 30 seconds to read the time zone and the currency back before confirming. Meta sets them once and for all, and they determine the time on your reports and the money on your invoices. Chosen well from the start, you will never come back to them.

Meta finally asks what this account is for. Choose the option saying it is for your own business, not for a client.

If the labels do not match exactly. Meta renames its screens several times a year. Trust the meaning of the action, here creating an ad account, and use the settings search bar with the word ad.

Step 4

Add your payment method

With no payment method the account exists and delivers nothing. Sort it now, not on the morning of the launch.

The direct shortcut is business.facebook.com/billing_hub/accounts, Meta's billing area. Add a payment card, a PayPal account or a direct debit, whichever suits you. Check that the country and the currency shown match what you chose.

It is also from this screen that you will download your invoices each month. Keep the address, your accountant will ask for it.

Meta sometimes takes a small amount to test the card. It is a simple validity check, refunded within a few days.

Your payment method does not leave your side. An agency runs the campaigns and the budget, it never sees your card number.

Step 5

Attach your Page and your Instagram account

An ad account on its own does not know who it is speaking for. It needs your accounts.

2 screens to open, Pages and Instagram accounts. On each, click Add and select yours.

Then check that the Page, the Instagram account and the ad account all live in the same portfolio. That gathering is what lets one ad go out on Facebook and Instagram in a single campaign. If your Page is not created yet, start with the guide on how to create a Facebook business Page.

Create your Facebook business Page
Step 6

Grant partner access to your agency

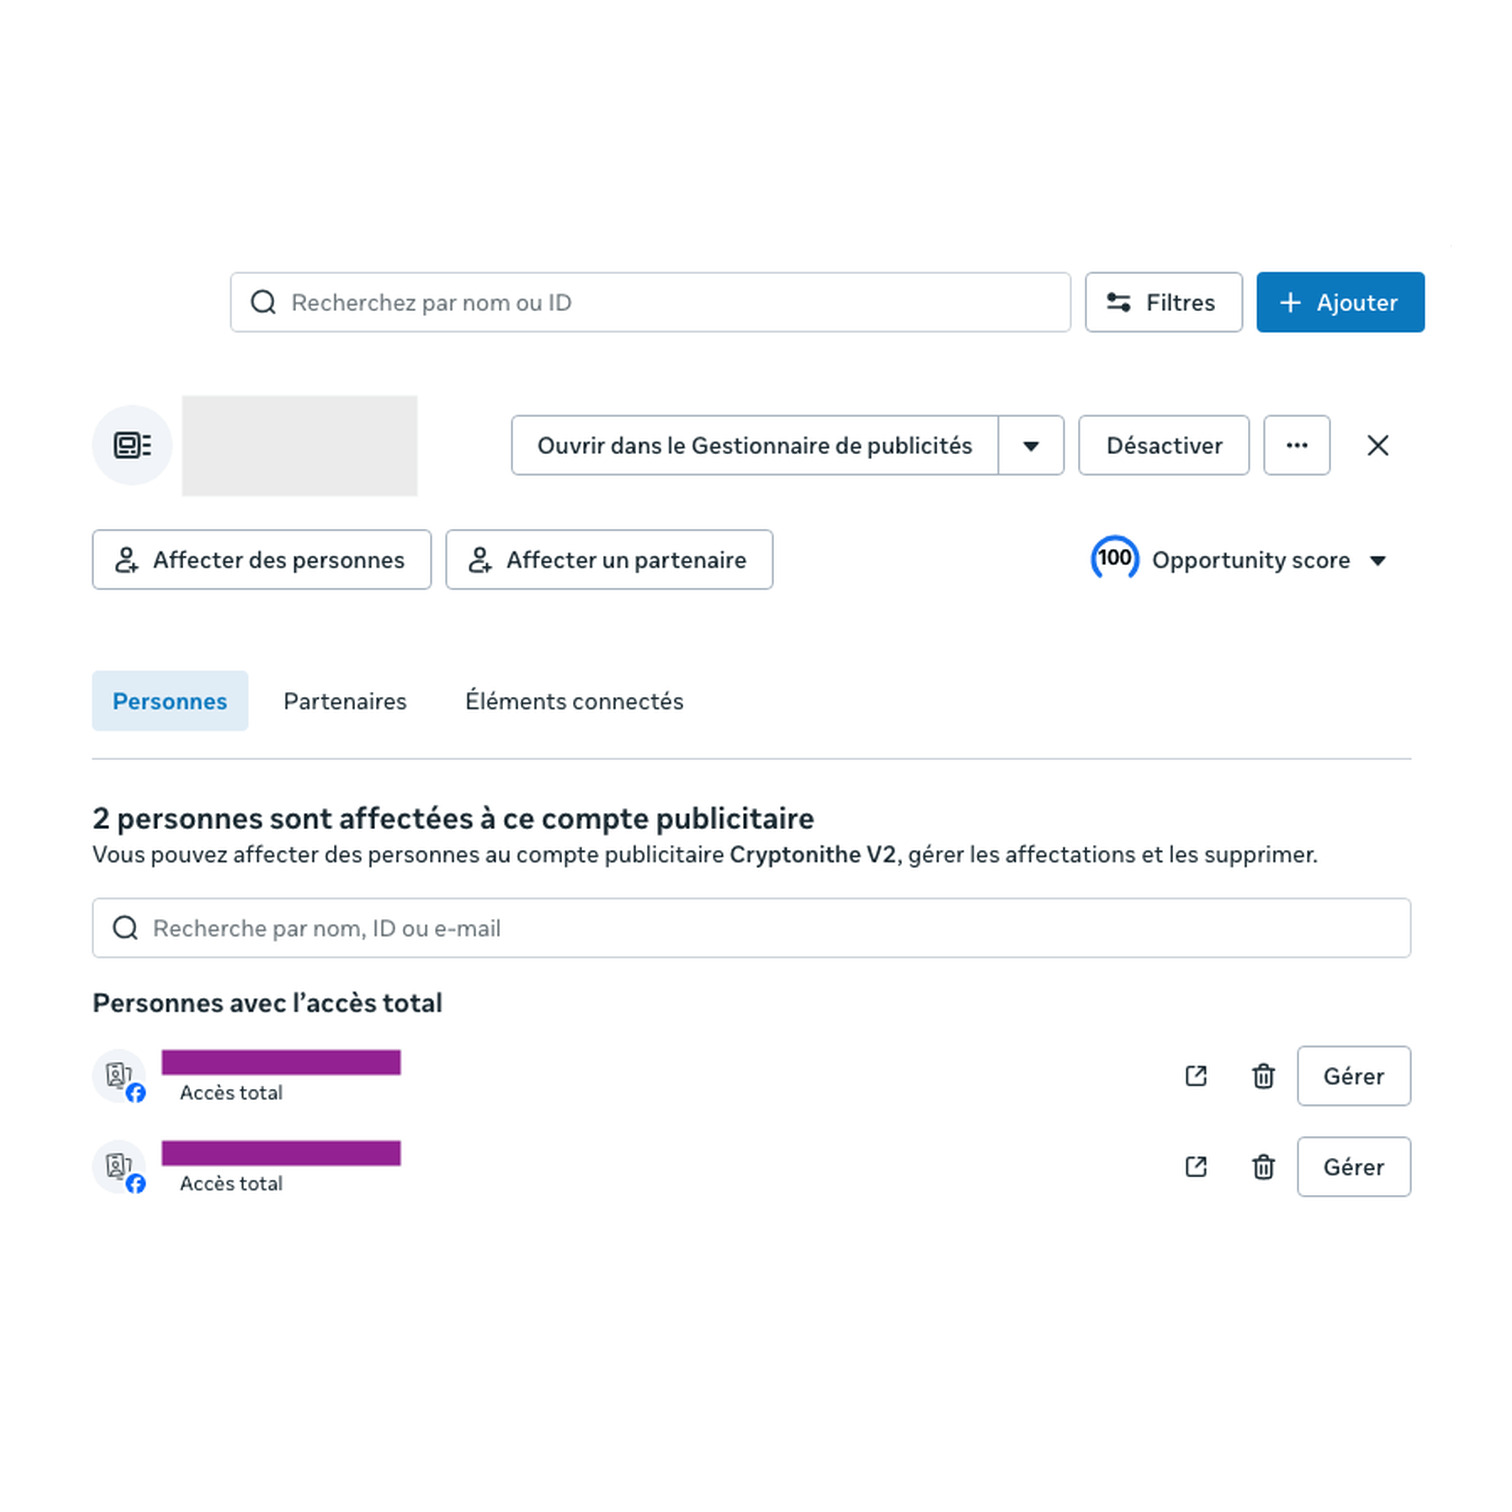
Last step, and it is the one that sets everything in motion. You do not add an agency as a user, you grant it partner access. That is not the same thing and it changes everything.

The difference is far from a detail. A partner works on your accounts from its own portfolio, with its own tools, without ever entering yours or knowing your credentials. You remove that access in 1 click, at any time, without touching your campaigns.

The full method, with our portfolio ID and the permissions to tick, is in the guide on how to share your Meta Business account with an agency.

From then on, your agents build your audiences, write your ads and follow your results. You keep the ownership, the budget and the final word.

Share your Meta Business account
Step 7

When it is the agency that invites you

There are 2 directions to this process. Spot yours in 10 seconds and you will go straight to the point.

The direction described above. You add the agency as a partner by pasting in its business ID. You are the one going to fetch it.

The opposite direction, just as common. The agency sends you an invitation and all you have to do is accept it. That is simpler for you, but it needs your numbers first to aim at the right place.

The 3 numbers to send over, and where to find them.

  • Your Page number. Open the Pages screen and click your Page. The number appears under its name, around 15 digits.
  • Your ad account number. Open the ad accounts screen. If it starts with act_, send only the digits that follow.
  • Your portfolio number. Open the business info screen. The number is at the top of the screen.

The message to copy, so nothing is forgotten.

Hello,

Here are my 3 numbers for access.

Facebook Page number ...........
Ad account number .............
Business portfolio number .....

Email address that receives enquiries ....
Contact person and phone number ..........

I look forward to your invitation.

The invitation arrives in 2 places. By email, at the address on your Facebook account, and do check your junk folder. And directly inside Meta, at the top of the left-hand column of the portfolio settings, under Invitations or Requests. If you see nothing in your inbox, the second place is bound to have it.

It has an expiry date. If you let it lapse, simply ask for it to be sent again. It takes 10 seconds and it erases nothing you have already done.

Step 8

The 3 settings that get your ads live first time

These 3 points take 20 minutes in total. Done in advance, your ads start without a hitch on launch day.

1. Get your payment card approved. Facebook takes a test payment of a few pence, which it refunds. Then open the billing area and check that the payment method is marked as active, not merely saved. That one small word makes the difference.

2. Put some content on your Page. Publish 3 or 4 posts with real photos before launching a campaign. Facebook trusts a living Page far more readily, and your ads clear review first time.

3. Show your contact details on the Page. Phone, email address, town. It is what someone discovering you looks at, and it is a trust signal for Facebook too.

The right habit. Sort these 3 points before asking your agency to prepare the campaigns. Everything will be ready at the same time, and you will launch on the day planned.

Step 9

Changing Page or account without losing everything

A common case, you are starting again on a new Page or a new ad account. Here is what carries over and what does not.

What cannot be recovered, and you have to accept it. A Facebook Page does not merge with another. The new one starts at 0 followers, 0 reviews, 0 history. An ad account does not merge either, the new one goes back into learning, which gives slightly weaker results for around 2 weeks.

What can be recovered, and it is the most precious part. The pixel, in other words the measurement that recognises people who have already visited your website. It does not depend on the ad account, it can be shared. All the audiences built on it stay usable.

⚠ So do not delete the old ad account straight away, it is the one holding the pixel. First share the pixel with the new account, check that it appears there, and only then close the old one.

And keep the old Page online while the new one takes over. Enquiries in progress still land there, and a Page closed too soon takes unread conversations with it.

For day-to-day running from here, everything happens in Meta Business Suite. And if you need to grant access the other way round, we set out sharing a Meta Business account.

Step 10

The 3 security steps to take from the start

15 minutes up front, and your account is protected for good.

1. Confirm your personal identity. Go to facebook.com/id and send in an official document. It takes 5 minutes and processing takes 1 to 2 days.

Why now rather than later. It is what lets Meta hand control back quickly if you lose access to your account. With a confirmed identity, recovery is settled in a few days instead of dragging on.

2. Switch on two-factor authentication. On your profile and on the portfolio, from the security centre. It is the most effective protection for the time it takes, and Meta requires it anyway before you can delegate access to an agency.

3. Add yourself to your own portfolio. It sounds odd, and yet it is the most common oversight. Your business portfolio is an entity separate from your Facebook profile. Add yourself as an administrator from the users screen, and you will finally see everything it contains.

And a practical point about access. Do not send your credentials to anyone, it is never necessary. The portfolio exists for exactly this, everyone comes in with their own account and receives what they need. You remove an access in 1 click, without changing anything else.

The number of ad accounts. Meta often grants just 1 at the start, and that is quite enough to get going, even with several campaigns. The cap rises as you spend, and verifying your business raises it too. The figure is shown in your portfolio information.

Liens utiles

Links to keep to hand

Keep this page open while you work.

  • Meta Business Suite, log in
  • Business portfolio settings
  • Ad accounts, the direct screen
  • Billing area and invoices
  • Confirm your identity with Meta
  • Share your Meta Business account with an agency
  • Create a Facebook business Page
  • Link Instagram to your Facebook Page
  • Our Paid Search Agent
  • Our Growth Hacking Agent
  • All our connection guides
  • Structuring your Meta ad account
  • Facebook instant forms, qualified leads
FAQ

Frequently asked questions

You do, directly to Meta, with your own payment method. We never touch your card. Every spend appears in your account, day by day.
No, Meta sets them once and for all when the account is created. That is why we take 30 seconds to read them back before confirming. Choose the currency and the time zone of the country you trade in, and the matter is settled for good.
Yes. It is a card validity check, refunded within a few days. It is not an advertising invoice.
Not always at the start, but Meta asks for it more and more, especially as spending grows. Filling in the registered company name, the address and the website correctly from day one will save you a block at the worst possible moment.
No, never. We ask for partner access to your ad account, which is a delegation from one business to another. You stay the owner, and you remove us whenever you like.
Meta caps the number per portfolio, and the cap rises with your spending. In the vast majority of cases, 1 ad account is enough, even with several campaigns.
Where to start?

A straight conversation. No sales patter.

We build your site bespoke, and our AI agents keep it alive. Updates, content, search visibility, security, it all runs without you having to think about it once. You settle the broad direction, the AI carries it out. And you get your evenings back.

Talk to us now
Logo Metabacklinks

Web & AI partner in Montpellier. We build websites self-managed by AI agents. You stay in control.

13 rue de Lavalette, 34830 Clapiers
Montpellier metropolitan area
06 68 34 12 84 · contact@metabacklinks.com

FacebookInstagramWhatsAppTelegramSMS
Services
  • Self-managed website
  • E-commerce website
  • Lead acquisition
  • SEO
  • Advertising campaigns
  • Second opinion
  • Redesign & maintenance
  • Advice and training
Task automation
  • Social channels that run themselves.
  • Fresh content, all the time.
  • Every page, in every language.
  • Quoted by AI. Found on Google.
  • An order book that fills itself.
  • Every client welcomed, at any hour.
  • A website kept up to date, on its own.
  • A website protected, day and night.
Latest articles
  • Create a Google Ads account11 Aug 2026
  • Create a LinkedIn Company Page11 Aug 2026
  • Create a Facebook business Page4 Aug 2026

© 2026 Metabacklinks · · Legal notice· Glossary· Emojis· Sitemap· LLM timeline· Partners· About· CRM